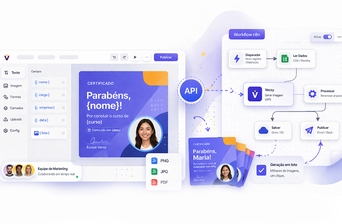
If you already use n8n to automate workflows — registrations, email blasts, WhatsApp notifications — you probably have at least one case where generating a personalized image for each user or participant without manual effort would be useful.
This tutorial shows you how to do this from scratch: create a custom card via Vecsy API within an n8n workflow and share the generated image. The example uses an event registration scenario, but the logic applies to certificates, welcome cards, social media posts, or any other case where you need image + user data.
What You’ll Need
- A Vecsy account with API access (find it under Automation → API inside your account)
- A template created and in Ready status on Vecsy, with dynamic fields defined
- n8n running — self-hosted or via n8n Cloud
- A Vecsy API token
Workflow Overview
The workflow we’ll build has three steps:
- Trigger — a webhook receives participant data (name, photo, email)
- Generate the card — an HTTP Request node calls Vecsy API and receives the image URL
- Share — an email or messaging node sends the image to the participant
Step 1 — Set Up the Template on Vecsy
First, the template needs to be ready. In Vecsy’s editor, create a template with the dynamic fields that will vary per participant. In our example:
name — participant’s name (text field)photo — participant’s photo (image field)
Note the template UUID — you’ll need it for the API call. It appears in the template URL or in the API section within the platform.
Step 2 — Create the Webhook Trigger in n8n
In n8n, create a new workflow and add the Webhook node as the trigger.
Configure it like this:
- HTTP Method: POST
- Path:
/registration (or any name that makes sense for your flow) - Response Mode: Respond with another node (if you want to return something to the caller) or Last node
Activate the webhook and copy the generated URL. It will look like this:
https://your-n8n.com/webhook/registration
This URL is the entry point of the workflow. On your website or registration platform, configure it to send a POST with participant data upon completion.
Example of expected payload:
json
{
  "name": "Ana Souza",
  "photo": "https://example.com/photos/ana.jpg",
  "email": "ana@example.com"
}
Step 3 — Call Vecsy API with HTTP Request
Add an HTTP Request node after the webhook.
Configure the fields:
FieldValueMethodPOSTURLhttps://www.vecsy.co/api/generate-imageAuthenticationHeader AuthHeader nameAuthorizationHeader valueBearer YOUR_TOKEN_HEREBody Content TypeJSON
In the request body, map the dynamic values coming from the webhook:
json
{
  "template_uuid": "18cc03b9-68c9-4aaf-ad74-17c8c76e0827",
  "file_format": "png",
  "name": "{{ $json.name }}",
  "photo": "{{ $json.photo }}"
}
Replace template_uuid with your template’s UUID and the field names (name, photo) with the fields you configured in Vecsy’s editor.
Expected API response:
json
{
  "url": "https://…",
  "key": "uploads/api/generate-image/…",
  "format": "png"
}
The url field contains a temporary download link for the generated image. Use this value in the next nodes of the workflow.
Note: the returned link is temporary. If your workflow needs to store the image longer, download and save it in your own storage (S3, Google Drive, etc.) before proceeding.
Step 4 — Share the Image
With the image URL in hand, the next step is to send it to the participant. Here are the two most common approaches.
Option A — Send by Email
Add the Send Email node (or Gmail, if you prefer) and configure:
- To:
{{ $('Webhook').item.json.email }} - Subject:
Your card is ready, {{ $('Webhook').item.json.name }}! - Body (HTML):
html
Hello, {{ $('Webhook').item.json.name }}!
Your card has been generated. Click the link below to download:
Download my card

Option B — Send via WhatsApp (using Evolution API or Twilio)
If your workflow includes WhatsApp, add another HTTP Request node pointing to your WhatsApp instance and pass the image URL as media:
json
{
  "number": "{{ $('Webhook').item.json.phone }}",
  "mediaUrl": "{{ $json.url }}",
  "caption": "Here is your card, {{ $('Webhook').item.json.name }}! 🎉"
}
Error Handling
Vecsy API returns standardized JSON errors. The most common you might encounter:
- 401 — Invalid or missing token. Check if the
Authorization header is correct. - 400 — Some dynamic template field is missing or has invalid format. Make sure all template fields are sent in the request.
- 404 — Template not found or not in Ready status. Verify the UUID and template status on Vecsy.
To handle this in n8n, add an IF node after the HTTP Request checking the status code:
- If
{{ $json.url }} exists → proceed to sending - If not → trigger an alert to the team or log the error
Final Workflow Result
[Webhook] → [HTTP Request: Vecsy API] → [IF: success?]
                                              ↓ yes
                                        [Send Email / WhatsApp]
                                              ↓ no
                                        [Error Log / Alert]
With this workflow, each new registration automatically generates a personalized card and delivers it to the participant without any manual intervention — regardless of volume.
Next Steps
With the basic integration working, some natural extensions:
- Store the image in Google Drive or S3 before sending, to keep a history
- Trigger at other times — course completion, attendance confirmation, user birthday
- Add human approval — insert a wait node to review the card before automatic sending
For any of these cases, the base structure is the same: trigger → call Vecsy API → action with the returned URL.
Want to test the integration? Access the complete API documentation or contact the Vecsy team to set up your access. Request API access →