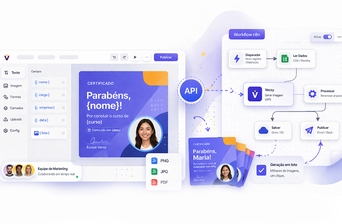
Manually issuing certificates is one of the easiest processes to automate — yet it remains manual in many cases due to the lack of a simple solution. Someone completes a course, finishes training, or attends an event, and a team member has to open a file, fill in the details, and send it.
With Vecsy's API connected to n8n, this process becomes an automated workflow: the trigger arrives (completion, confirmed registration, attendance recorded), the certificate is generated with the participant's data, and delivered via email or WhatsApp with no manual intervention.
This tutorial shows you how to build this from scratch.
What You’ll Need
- A Vecsy account with API access — create and manage your tokens under Automation → API within the platform
- A certificate template created in Vecsy, in Ready status, with dynamic fields configured
- n8n running (self-hosted or n8n Cloud)
- An entry point for the trigger — this can be a webhook from your system, a form, or an updated spreadsheet
Step 1 — Create the Certificate Template in Vecsy
The template is the foundation. In Vecsy’s editor, design the certificate layout with your branding and define which fields will vary per participant.
For a course completion certificate, the most common fields are:
FieldTypeExamplenameTextAna SouzacourseTextAPI AutomationdateText05/30/2025photoImagePublic URL of the photopositionTextDevelopercompanyTextAcme Corp
You don’t need to use all of them — configure only the ones relevant to your case. The important part is that every field defined in the template must be sent in the API call, otherwise the request returns a 400 error.
After configuring, note the template UUID. It appears in the template URL or in the API section of the platform.
Step 2 — Build the Workflow in n8n
The certificate workflow has this basic structure:
[Trigger] → [HTTP Request: Vecsy API] → [Send to participant]
With an optional storage step between generation and sending:
[Trigger] → [HTTP Request: Vecsy API] → [Save to Drive/S3] → [Send to participant]
Let’s build each part.
Step 3 — Configure the Trigger
Choose the trigger based on how you know a certificate needs to be issued.
Option A — Webhook (recommended)
Use this when your platform or system can POST upon course or event completion. Add the Webhook node in n8n:
- Method: POST
- Path:
/certificate
Expected payload:
json
{
  "name": "Ana Souza",
  "course": "API Automation",
  "date": "05/30/2025",
  "photo": "https://example.com/photos/ana.jpg",
  "email": "ana@example.com"
}
Option B — Google Sheets
Use this when you record completions in a spreadsheet. Add the Google Sheets → On Row Added node and map the columns to the workflow variables. This works well for operations where completion tracking is done manually by a team.
Step 4 — Call the Vecsy API
Add an HTTP Request node after the trigger with the following configuration:
FieldValueMethodPOSTURLhttps://www.vecsy.co/api/generate-imageAuthenticationHeader AuthHeader nameAuthorizationHeader valueBearer YOUR_TOKEN_HEREBody Content TypeJSON
Request body:
json
{
  "template_uuid": "YOUR_UUID_HERE",
  "file_format": "pdf",
  "name": "{{ $json.name }}",
  "course": "{{ $json.course }}",
  "date": "{{ $json.date }}",
  "photo": "{{ $json.photo }}"
}
Some notes on the parameters:
file_format: use pdf for certificates (more suitable for formal documents) or png if you want an image to share on social media. The default is png.- Field names: must exactly match the names configured in Vecsy’s editor (case-sensitive).
- Photo field: must be a public URL accessible via HTTPS. If the photo comes from a user upload, verify the link is public before passing it to the API.
Successful response (HTTP 200):
json
{
  "url": "https://…/certificate-ana-souza.pdf",
  "key": "uploads/api/generate-image/…",
  "format": "pdf"
}
The url field is the temporary link to the generated file. Use it in the next nodes.
Step 5 — (Optional) Save the Certificate Before Sending
If you need to archive certificates or the Vecsy temporary link might expire before sending, add a storage node between generation and delivery.
Google Drive
Add the Google Drive → Upload File node:
- File URL:
{{ $json.url }} - File Name:
Certificate - {{ $('Webhook').item.json.name }}.pdf - Folder: select the destination folder
After upload, you’ll have a permanent Drive link to use in the email.
Amazon S3
Add the AWS S3 → Upload node and pass the file URL. Useful when certificates are part of a digital product requiring a permanent link.
Step 6 — Deliver the Certificate to the Participant
By Email
Add the Send Email (or Gmail) node:
- To:
{{ $('Webhook').item.json.email }} - Subject:
Your certificate is ready, {{ $('Webhook').item.json.name }}! - Body (HTML):
html
Hello, {{ $('Webhook').item.json.name }}!


  Congratulations on completing {{ $('Webhook').item.json.course }}.
  Your certificate is available at the link below:


    Download Certificate


  The link will expire soon. We recommend saving the file as soon as possible.
By WhatsApp (via Evolution API or similar)
json
{
  "number": "{{ $('Webhook').item.json.phone }}",
  "mediaUrl": "{{ $json.url }}",
  "caption": "Congratulations, {{ $('Webhook').item.json.name }}! Here is your certificate of completion for {{ $('Webhook').item.json.course }}. 🎓"
}
Error Handling
Add an IF node after the Vecsy HTTP Request to check if generation was successful before proceeding:
- Condition:
{{ $json.url }} exists and is not empty → true → proceed to sending - False → trigger a notification to the team (Slack, alert email) with participant data for manual reprocessing
Main API errors:
CodeCauseWhat to do401Invalid or missing tokenCheck the Authorization header400Missing or invalid fieldVerify all template fields are sent404Template not found or not ReadyCheck the UUID and template status in Vecsy
Complete Workflow
[Webhook / Google Sheets]
        ↓
[HTTP Request → Vecsy API]
        ↓
    [IF: url exists?]
    ↓ yes              ↓ no
[Save to Drive/S3]   [Alert team]
        ↓
[Send via Email / WhatsApp]
When This Workflow Makes a Difference
The real benefit shows when volume increases. A platform issuing 50 certificates per month can handle this manually without hassle. At 500 per month, the process starts to become burdensome. At 5,000, you either automate or need someone dedicated solely to this task.
With this workflow live, each completion generates and delivers the certificate in seconds — whether it’s 3 AM or the middle of a holiday.
Want to set up Vecsy’s API in your workflow? Contact the team to get access and clear up any integration questions. Request API access →